The most comprehensive guide to create your own Upwork/Odesk/Elance like site using WordPress.

Freelancing is a methodical concept, if you want someone else to get your work done then, all you need to do is to hire an expert for the specific task, and award your task to the one, who is ready to fulfill it according to your budget. That’s the power of Freelance, it provides you the ability to hire the best experts even for your miniature tasks.
Earlier, I had created a similar guide on how to create a Freelancer like site using WordPress using Sitemile’s Freelancer theme, it was highly appreciated by everyone.
Today, I’m writing a similar article on how to create a website like Upwork using WordPress. Well technically there’s not much difference between Freelancer vs Upwork, as both offers a platform for the service providers and buyers. However, I noticed that Upwork gives more emphasis on how qualified their freelancers are, showcases their profile first with the respective job success rates, whereas Freelancer tries to put more focus on how affordable you can get your job done at Freelancer.
Apart from that, there are various features which gives Upwork an edge over Freelancer such as, you can hire an agency or a freelancer on Upwork, whereas on Freelancer.com you can only hire an individual freelancer for your work or projects.
The Upwork concept

Often famously quoted as “Gig economy,” a myriad amount of youth sports a side job or freelancing, as according to Forbes over 44% of the age between 25 – 34 does a freelancing job together with their regular jobs. These so-called self-employed are available for all sorts of works, be it related to programming a website, building a new app, writers, designers, hiring customer service agents, account managers etc.
The Upwork.com, a merger between previous Elance and Odesk is a freelance marketplace which provides a platform between the clients and freelancers, the client posts his job with detailed requirements about his project, where the freelancer bids for the project . Further, the client can personally interview with the chosen freelancer over private messages, which he would hire him on the mutually agreed rate.
For the Clients – Upwork offers a set of plans, free, Pro and Enterprise. Under Free, you can post jobs and simply hire the freelancer. While for the Upwork Pro and enterprise you’ve to pay the charges for posting jobs and you’ll get access to pre-vetted freelancers by Upwork, a dedicated account manager and more.
For the Freelancers – Freelancers are free to join the platform, and they can paid by hourly or fixed price projects. On successful completion of the job, once the client makes the payment for the job, the freelancer receives the payment, after a deduction of freelancer service fee by the Upwork. The charges range from 20% to 5% of the total price of a job.
The requirements to create a website like Upwork

FreelanceEngine WordPress Theme
To create a website like Upwork using WordPress we must need a freelance app theme, as the base platform of your Upwork like site.
A freelance app theme, is a typical WordPress theme like the one I am using on this blog i.e, Divi. However, they are far more capable, loaded with specific set of features required for creating a certain type of website, such as Upwork or freelance.
For this purpose, I had chosen FreelanceEngine WordPress theme by EngineThemes, a very popular WordPress application theme maker, specialized in creating complete platforms. The theme is modern with minimal design, equipped with wide-set of features and you can easily control the content and front-end without leaving the homepage.
The FreelanceEngine theme is translation ready, that means you can localize the theme for a region specific site or you can even make it a true multilingual site.

Additionally, the theme is mobile ready with a dedicated responsive mobile version of the site, so you need not to worry about your potential smartphone visitors or just any device on your Upwork like site. Also the Freelance Engine comes pre-equipped with a built-in Escrow system for a reliable workflow system and enables smoother transactions.
I will talk about all the features of the Freelance Engine theme, later in this guide. But, first I’ll carry on about the requirements to create a Upwork like site :-
A domain name – It’s where your Upwork like site will go live, you can choose any TLD for your site. However, you if you already have one, then you can skip this step.
WordPress Hosting – Since, this isn’t a regular WordPress based site and it would require a reliable WordPress hosting I would recommend you to opt for a managed WordPress hosting provider such as SiteGround, WPOven, and InMotion hosting.
Personally, I would recommend you SiteGround for the beginning, as they are affordable with theirplans starting at just $3.95/moth and offers super fast managed WordPress hosting for the price. Though, I had also provided a link to my most recent WordPress hosting reviews you can check accordingly.
SiteGround WordPress hosting review
WPOven WordPress hosting review
InMotion WordPress hosting review
For more in-depth information about managed WordPress hosting you can refer to this detailed guide.

FreelanceEngine Theme – It’s the core of your Upwork like the site, you would require to purchase a license of FreelanceEngine theme, with the basic version starting at just $89 onwards, up to $289 for Pro license with access to all FreelanceEngine extensions.
The extensions at FreelanceEngine are nifty plugins, which allows you to add various enhancements to your Upwork like site, such as integrating payment gateways, milestone, private messaging, virtual currency and much more.
Please note: Some features won’t work unless you’ve bought the related FrE extensions therefore, if you’re willing to use all the features of the theme, then make sure you buy the related extensions or instead simply buy the Plus or Pro license with bundled extensions.
In a rough estimation to create a basic Upwork like site, it’ll cost you :-
- $10 domain registration
- $48 WordPress hosting
- $89 FreelanceEngine theme
Overall at least $150 for a year.
How to set up Upwork like site?
Believe me, It isn’t some sort of rocket science to set up a site with WordPress. If you had already bought the copy of the FreelanceEngine Theme, a WordPress hosting account, and a domain name, then it won’t take more than an hour in any scenario to come up with a basic version of your Upwork like site.
Let me tell you how, but before we start, keep the following things handy.
- Access to you domain name account
- Access to your WordPress hosting
- A copy of FreelanceEngine WordPress theme
If you had registered your domain name from a different domain name registrar then you’ve to manually configure your domain name to propagate with your WordPress hosting account.
However, if you’ve purchased the domain name with your WordPress hosting provider, then you won’t need to configure name-servers, as they are automatically paired with your hosting account, or it may require minimal intervention.
For more detailed guide on how to propagate your domain name with hosting account, use this guide at Godaddy.
Once you finish the domain propagation, the next step is to install WordPress. Although, most of the WordPress optimized hosting providers, nowadays comes with pre-ready WordPress installation or has cPanel based script installer for WordPress, such as Softaculous and Fantastico.
Therefore, chances are high that you won’t need to manually install WordPress, still if you need a helping hand then you can use this famous 5 minute guide at WordPress.
As, soon as you finish with installing WordPress, the final step is to install the FreelanceEngine theme
Installing FreelanceEngine WordPress theme
To install the theme on your WordPress installation

- Login to your WordPress admin dashboard.
- Navigate to the Dashboard>Appearance>Themes>Install themes and click on Add New.
- Now choose, Upload theme, and click on the choose file button,
- Select the WordPress theme file from your computer, and click on “Install now” button
- And that’s it, your FreelanceEngine theme is now installed and activated on your WordPress site.

Configuring FreelanceEngine Theme
Alright, so that was easy, ain’t it? now you’ve a WordPress site with FreelanceEngine theme installed and ready to be configured. You might had noticed that inside your WordPress admin dashboard, a range of new options available on the left panel of your WordPress site dashboard. Let’s quickly discuss about them.
Engine Settings
This section allows you to take complete control of FreelanceEngine theme. Inside this area, you’ll find all sorts of options to manage the look and feel of your Upwork like site. I’ll briefly talk about each tabs available here.
Overview
The first thing here is overview, and as the name indicates this overview panel showcases all the crucial stats relating to your Upwork like site in beautiful graphs, be it the revenue of your site, the total number of projects, and registrations etc.
Settings

As you can see, the settings tab contains many sub settings that you can configure of your theme.
General
In the general section, you can define your website title, description of your website and the copyright information which will appear in the footer area of your site. In order to track the website stats of your site, I suggest you to use the Google Analytics, which is a powerful yet free service to give in-depth stats about all traffic that hits your website. The Google Analytics script provided by Google, can be added here.
You can configure, whether you want your users to confirm their email address after registration or not. Similarly, you can also enable admin notification over email, whenever a new user registers on your Upwork like site.
To make it secure, you can prevent your registered site users from direct login to admin page.
You’re going to add the links to your site’s social media profiles in the social links section, the links to your social profiles will automatically appear on the footer of your site, as well as on the sidebar of your blog.
There’s also an option to disable the automatic page creation, use this option appropriately.
Content
In the content tab, you can set up the budget filter limit for projects page and profile pages. If you don’t want any project get posted without your approval, then you can do the same by enabling the pending post feature.
You can always, set max number of categories in order to prevent over selection of categories by the user of your site while submitting any project, as well as by employers who can input while posting any project.
Similarly, you can also limit the total number of skills any freelancer adding in his profile, moreover employers can also be restricted to input max number of skills, while posting any project.
If you want, then you can enable WordPress comments on all project pages. In the last, Invited to bid option if enabled will require freelancers to be invited before bidding on any project.
Freelancer

The FreelanceEngine theme gives you an additional option to make the freelancer pay to bid for any project. There’s a built-in set of three different bid plans, however you’re free to create any number of your own plans.
URL slug
It’s a section to modify the existing URL slug for all the pages of your Upwork like site. You won’t need to modify anything in this section, unless you really know what you’re doing.
Header Video
The theme gives you freedom to set up a video background on the homepage of your site, you can upload a video on your own site server, or give the video URL from YouTube.
Payment
Under the payment settings, you can define the currency and the currency symbol you’re willing to use on your site be it US Dollar, Euro, British Pound, Indian Rupee etc. The theme comes with pre-integrated PayPal, 2Checkout payment gateways, and a cash payment option, as well.
You can define your own payment plans or use the built-in payment plans to let your users submit the projects. Alternatively, there’s also an option to allow your users submit the listing for free.
The built-in test mode allows you to test the payment system without charging your account.
Mailing
The theme has a powerful built-in email notification system with a wide variety of ready-made templates which, are automatically mailed upon the events.
For instance:
- Register mail template : a register mail template will be automatically dispatch an email to the user when has been successfully registered on your site.
- Confirm mail template: send to the user after had successfully registered, and need to verify his email.
Alike these, the FreelanceEngine comes with more than 40+ various email templates related to user authentication, project related, project reports related, and related to the payments.
You can always alter the ready-made mail templates as according to your needs, you can even use the placeholders to include specific content from WordPress to your mail templates.
Language
I really like the built-in website language system in the FreelanceEngine theme, not just you’re free to select any language out of more than 20 different languages but, also the included translator enables you to translate any language into your local language, right from your theme dashboard.
Update
The update section let’s you update your theme to the latest build.
Members

The third tab is the one stop panel to administrate all the members of your Upwork like site with a feature to search a member by his name. It lists down every single registered users available on your site with initial details such as his picture, country, joining date, the total number of comments by him, etc.
You can at any given time change the user level of any user, from Freelancer to Employer or even escalate his user level as, an administrator. You can always ban any user, who had void the terms and conditions of your site.
Payments

It’s the most crucial section of your freelancer site, where you’ll manage all the payments done by the users. This section lists down all the payments, that you had received from any payment gateway.
For the cash payments, here you can approve them, once the said transaction amount is reflected in your account, or else you can simply decline the payment. You can even, search the payment for any project by simply typing the name of the project.
Setup Wizard

This setup section is a simple panel from where you can add new projects, project categories, project type, skills, profile, pages and posts. You can anytime delete the sample data, which you’ve installed on your new site.
Payment Gateways
I was really amazed with the amount of effort the guys at EngineThemes had put in while adding support for several payment gateways. With native support for so many payment gateways, you’re providing your users with freedom to choose any preferred mode of payment.
The FreelanceEngine theme has separate tabs to configure the following payment gateways:-
- MOLpay
- PayFast
- PIN Payments
- PayU Money
- SagePay
- BrainTree
- Stripe
Social Login

Personally, I always prefer to sign up to any service on the web using my existing social media accounts after all, it’s easy and always consume lesser time, in comparable to your typical email based sign up.
With FreelanceEngine, you can always allow your user to sign up using their respective social media accounts, as of now the theme supports social logins from, Twitter, Facebook, Google, and LinkedIn.
To enable the social login, you need to manually sign up for each social media API, and configure them for only once.
Escrow Configuration

Escrow is a must have feature for running a website like Upwork, after all it secures the money and guarantees the freelancer that he’ll get the payment upon successful completion of the project. Also, Escrow serves as an additional mode of revenue for your Freelancer site.
In case if you don’t know what is Escrow?
An escrow is a financial arrangement where a third-party holds and regulates payment of the funds required for two parties involved in a given transaction. It helps make transactions more secure by keeping the payment in a secure escrow account which is only released when all of the terms of an agreement are met as overseen by the escrow company. Read more
You won’t need to look for third-party escrow system to integrate with your Upwork like site, as there’s already an integrated Escrow system comes along with this theme. There’s separate gateways to be configured for Escrow system.
Credit System
It’s a fully virtual currency system, where your users can add funds in their respective accounts and can anytime make use of that credit to make any transaction across your entire site.
To restrict the unauthorized usage of credit system, there’s a feature called secure code, once enabled a unique secure code is provided on the mail, which is required to complete a transaction, whenever a user uses his account credit across the site.
You can use the built-in credit plans or you can also create custom credit plans. Further, there’s a full-fledged automated mail template system dedicated for credit system, where professional email notification will be sent to the users, and the admin of the site.
Withdraw
Under the withdraw tab, each and every transactions related to withdraw is listed. If you want to track any of withdraw request, you can find it here. You can even search any withdraw request by project.
Milestone

Milestone is actually a very efficient project tracking feature, it allows better project control. Think of it as adding road map for individual projects, which allows the freelancer to analyse the scope of any project and timeline he need to follow.
It makes work easier for both of the parties, as an employer can easily describe his project in multiple milestones, in what order he wants his project to be completed and simultaneously, it becomes easy for Freelancer to understand the goals related to any project. All in all, it helps to make the communication flow smoother between the employer and a freelancer.
In the settings area you can define, the maximum number of milestones allowed for a single project. There’s again a mailing system to notify over email related to any update, resolve, reopen and closure of on any milestone.
Private Message

If you had ever used service like freelance sites, I’m sure you must have use this important feature called, private messaging. Whenever, you post any project on freelance site, interested freelancer bid for your project but, before awarding any project to a freelancer I had always tried to talk with the Freelancer before accepting his bid. This gave me a general idea about the candidate, whether he/she is the right person to award my project or I’m simply wasting my time.
This theme has a built-in professional grade private messaging system that allows the employers on your site to communicate with the bidders. And there are a couple of settings which you can configure, as according to your needs such as, time delay between two messages, two replies and two emails. Of course, an email notification with a link to the message is sent to the user, whenever he receives a new message.
So, that was the end of a brief tour of back-end settings from the FreelanceEngine theme in my words. Now before, I talk about the front-end, you might be wondering like:-
Why are there so many new options in the WordPress back-end?

Once you install the theme on your WordPress installation, you might notice all those new options appear in the left side access panel of your WordPress dashboard.
These are actually the WordPress custom post types and custom taxonomies used by the theme, they are created to hold the information such as new projects, members, portfolio, bid plans, credit data, private messaging , notifications etc in a much organized manner.
Usage of CPT or Custom Post types or Custom Taxonomies is always suggested, it’s an efficient and WordPress friendly way to use WordPress a CMS.
Anyways, you won’t need to access them regularly however, once in a while you might need to check sections such as notifications, and credit related information.
Now before I move to the front-end, let me quickly show you how it’s like to access all the projects from back-end of your site. In the screenshot below, you can see a complete illustration of a project posted on the Upwork like site.
Being an admin you can anytime access a project from your WordPress Dashboard > Projects > select any project

FreelanceEngine Front-end
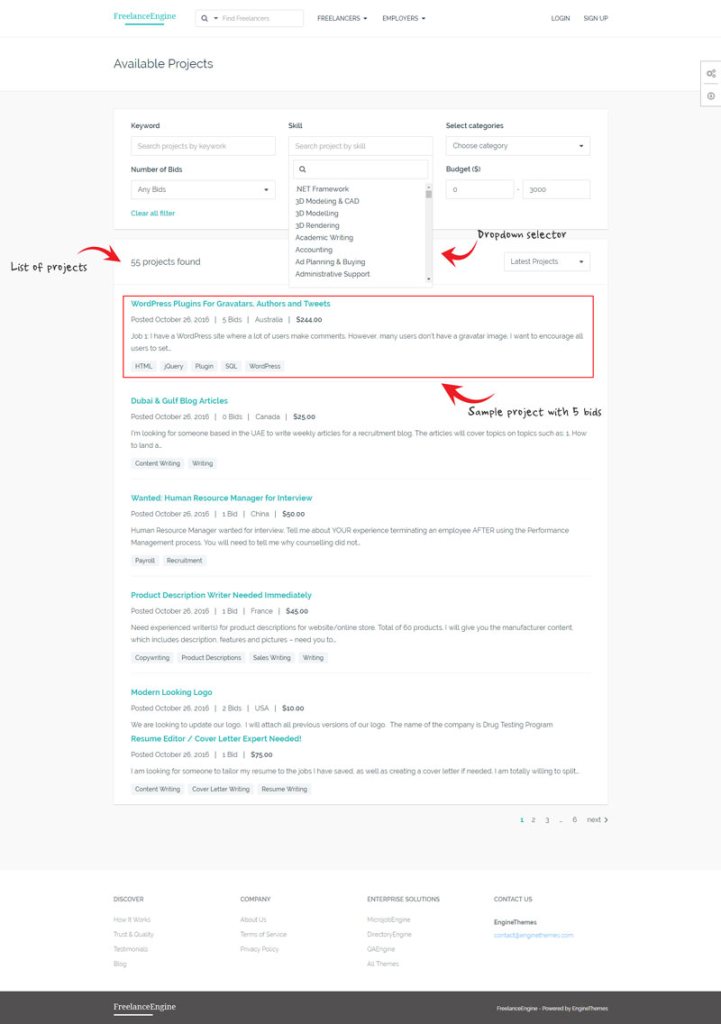
Now I’m at the front-end of the Upwork like site and the below screenshot shows a Projects archive. You can see a nice clean interface, with advanced faceted search for finding any projects.
Project Archive
Single Project Page
Here’s a screenshot of a typical single project page.

Login Page
A login page screenshot

Profile login page

Once we login using our credentials, you can see an actual screenshot of the user dashboard below. It’s beautiful minimal layout design with content organized in a nice tabular format. Under the Account details, as you can see there’s a basic information about your user, such as name, profile pic, etc with an option to change password, a link to request new secure code for the built-in credit system and logout.
In the second tab, all the user projects will appear, while in the third tab your user can find all his private messages.

The last tab details all basic information related to your user account such as their payment method, credit balance and all the transactions they had done on your Upwork like site.
Submitting a new project

And finally, this is how it looks when an employer want to submit his project on your site. In the above screenshot I’ve selected a free project which, can be changed to a paid one. Then user needs to provide the categories of the project, the title of the project and a rich editor to describe his project in detail.
If your user wants, then he can also upload his files, followed by the skills he demands for his project, his budget, location (if required), the milestones, and once he presses the submit project button, his project will be submitted and appear in draft for your approval.
This is it, your site like Upwork is now ready!
FAQs related to creating a website like Upwork
I want to see a demo working version of the theme, how can I?
Oh sure, you can head over to this demo link. Not only the front-end, you can even access the back-end of the theme panel and access all administrator level features.
Can I be able to handle my site alone, do I need special training to run a Upwork like site?
Indeed, if you’re proficient in using internet then, it won’t take much longer for you to learn how to run your own WordPress based site. Since, you’re just starting it won’t take much of your time, and you can easily handle everything on your own.
Will I be able to succeed with my Upwork like site?
Well, don’t expect you’re going to overtake Upwork within a short span of time or if you think you’re going to become the next millionaire with this guide to create a site like Upwork. If so, then immediately close this tab right away and please don’t waste your time, money and energy. This guide is strictly not for you.
However, if you’re looking to create a regional site, or a Upwork like site for any local group, then chances are high that you may succeed. You may be able to make good return but, most importantly you’ll gain priceless experience with creating such site.
I already have a site, can I add it to my existing site?
Oh yes, you can install this theme on your existing site, you just need to install WordPress on a different directory of your site.
For instance: – yoursite.com/myupworklikesite/ or you can also install it on a sub domain at myupworklikesite.yoursite.com.
I’ve few doubts relating to this guide
You’re more than welcome to ask all your doubts about this guide, I’ll try my best to answer them all. You can drop your queries in the comments below, you can also use this form to personally ask any questions.
Alternatively, for customization request you can also reach out to the creator of the FreelanceEngine theme at this page.
Are you going to get commission, if I buy hosting or themes from your link?
Absolutely yes! but it won’t cost you anything extra, and it helps me to keep this site running. :)

Thanks a lot for sharing this, recently we built our freelance platform with similar theme but until now we are looking for a better option maybe we will try to buy this, our site is Realfreelancer.com.
Hi Pranjal,
For payment gateways, do I contact the payment processor myself to set it up?
Eugene
First of all we would like to thank you, Pranjal for helping us promote this product!
Hello Eugene,
Regarding your concern about Payment gateway,
You can review all FreelanceEngine Payment gateways and how to use it here.
https://www.enginethemes.com/freelanceengine-extensions/
If none of the plugins meet your requirement, you can use Cash payment gateway as Bank transfer payment.
For your further needs, please contact our Support team directly via support@enginethemes.com. We will get back to you the soonest.
Regards,
Also, I would like to inform you that: For each payment gateway you use, you need to create the corresponding account and apply API to receive payment.
HI Pranjal
I need help with customization of Freelance Engine theme. I have bough the pro theme with all add-ons and already have it installed on my domain
What is a good number to talk to you about customization
Deepak